")
Inhoudsopgave:
- Stap 1: BEREIDEN VAN DE WIELEN
- Stap 2: BEVESTIG DE MOTOREN AAN HET CHASSIS (CARROSSERIE)
- Stap 3: BEVESTIG DE WIELEN AAN DE MOTOREN
- Stap 4: SLUIT DE MOTOREN AAN OP DE MOTORDRIVER
- Stap 5: VERBIND DE MOTORDRIVER MET ARDUINO
- Stap 6: VOEDING VOOR MOTOREN
- Stap 7: VERBIND BLUETOOTH
- Stap 8: UPLOADEN DE CODE
- Stap 9: BLUETOOTH-APP
- Stap 10: GEFELICITEERD
- Auteur John Day day@howwhatproduce.com.
- Public 2024-01-30 11:19.
- Laatst gewijzigd 2025-01-23 15:01.

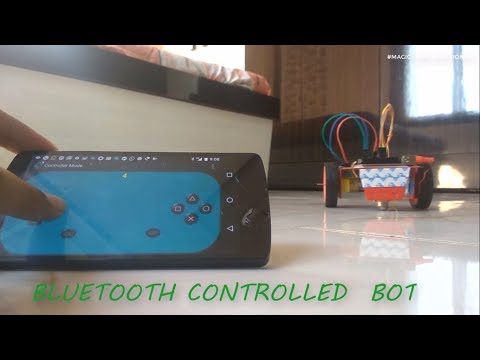
IN DEZE INSTRUCTIEBARE LAAT IK TONEN HOE JE EEN EENVOUDIGE BOT MAAKT DIE DOOR JE SMARTPHONE VIA BLUETOOTH WORDT GECONTROLEERD
NODIG ONDERDELEN:
ARDUINO
☻2X VERSNELLINGSMOTOREN
☻HC-05 BLUETOOTH-MODULE
☻LAPTOP OF PC (VOOR HET UPLOADEN VAN CODE NAAR ARDUINO)
STROOMVOORZIENING (IK HEB EEN POWER BANK GEBRUIKT OM BATTERIJEN TE BESPAREN)
☻JUMPER DRADEN
☻WIELEN
☻CHASSIS (CARROSSERIE)
Stap 1: BEREIDEN VAN DE WIELEN


IK HEB TWEE WIELEN SAMEN VERBONDEN OM EEN BREDE WIEL TE MAKEN ZOALS AFGEBEELD OM MEER STABILITEIT TE VERKRIJGEN
VOOR EXTRA STABILITEIT GEBRUIKTE IK SUPER LIJM EN VERWIJDERDE EXTRA LIJM MET ACETON
Stap 2: BEVESTIG DE MOTOREN AAN HET CHASSIS (CARROSSERIE)
")
")
")
")
EERSTE SOLDEER TWEE JUMPERDRADEN AAN ELK VAN DE MOTOREN ZOALS AFGEBEELD
BEVESTIG VERVOLGENS DE MOTOREN AAN HET CHASSIS MET BEHULP VAN DE BOUT.
Stap 3: BEVESTIG DE WIELEN AAN DE MOTOREN


DRUK EN DRAAI EEN KLEIN OM AAN DE WIELEN AAN DE MOTOR TE BEVESTIGEN
Stap 4: SLUIT DE MOTOREN AAN OP DE MOTORDRIVER


VERBIND DE 4 DRADEN VAN DE MOTOR NAAR ELK VAN DE 4 UITGANGEN VAN DE MOTORDRIVER.
Stap 5: VERBIND DE MOTORDRIVER MET ARDUINO


SLUIT ELK VAN DE 4 INGANGEN VAN DE MOTORDRIVER AAN OP PIN 8, 9, 10, 11 RESPECTIEF VAN DE ARDUINO UNO
Stap 6: VOEDING VOOR MOTOREN


IK HEB EEN USB GEBRUIKT OM MIJN BOT VAN VOEDING TE LEVEREN
EENVOUDIG STRIP VAN HET VRIJE EINDE VAN DE USB EN VERWIJDER DE ISOLATIE OM 4 DRADEN TE ONTHULLEN.
HOUD ZWARTE EN RODE DRADEN EN MAAK DE ANDERE TWEE DRADEN DOOR.
SLUIT ROOD AAN + EN ZWART AAN NEGATIEF VAN DE VOEDING VAN DE MOTORDRIVER.
Stap 7: VERBIND BLUETOOTH


VERBIND HET BLUETOOTH-APPARAAT HC-05 MET DE ARDUINO:
sluit rx van bluetooth aan op tx van arduino
sluit tx van bluetooth aan op rx van arduino
vcc naar +5v
gnd naar gnd
Stap 8: UPLOADEN DE CODE

OPEN DE CODE MET DE ONDERSTAANDE LINK EN UPLOADEN NAAR DE ARDUINO
LINK:https://drive.google.com/open?id=1LFiq5kcdtwzrAfNUjZtbnxqNwQx4e9pM
OPMERKING: VERWIJDER DE TX- EN R-PIN VAN BLUETOOTH ALVORENS DE CODE TE UPLOADEN
Stap 9: BLUETOOTH-APP


☻Download Arduino Bluetooth-controller van Play Store
☻klik op verbinden en selecteer uw Bluetooth-apparaat.
☻open de controllermodus en klik op commando's instellen in het zijmenu
☻Stel de waarden in als
omhoog-1
omlaag-2
links-3
rechts-4
OPMERKING: U MOET MOGELIJK EEN KLEINE PROEF EN FOUT DOEN EN DE CONFIGURATIE VAN DE CODE OF MOTOREN EEN KLEIN WIJZIGEN OM HET GEWENSTE RESULTAAT TE KRIJGEN
Stap 10: GEFELICITEERD

JE BENT NET KLAAR MET HET MAKEN VAN DE BOT
NU KUNT U DE BOT BEDIENEN VANAF UW TELEFOON.